Did you know that the bones in children’s hands are still developing before the age of seven? An x-ray of a three-year-old’s hand compared to a seven-year-old reveals a startling difference. (Source)
For many young children, this means that the process of writing can be uncomfortable and even painful as they haven’t yet developed enough muscle tone to hold a pen or pencil correctly.
No wonder some children are reluctant to write!
In my work as an educational advisor, I tell everyone this:
The answer is to provide lots of activities to strengthen and build up the muscle tone in their hands and fingers. We need to give children lots of practice in precise hand movements such as:
Squeezing
Twisting
Unscrewing
Pinching
Pushing
Peeling
Rolling
Pegging
Threading
All of these movements and many more will help to build up a good pincer grip and mean that the process of writing is more comfortable and enjoyable.
Fine motor development goes hand in hand with gross motor development which is all about building up the larger muscles in the body. (Source)
In my long career in teaching and advising, I must have tried hundreds of fine motor activities! And in this article, I’ve condensed all that experience into the ultimate twelve activities for preschoolers. Let’s dive in…

1. Pac Man Monsters!
These are ones you simply must try!
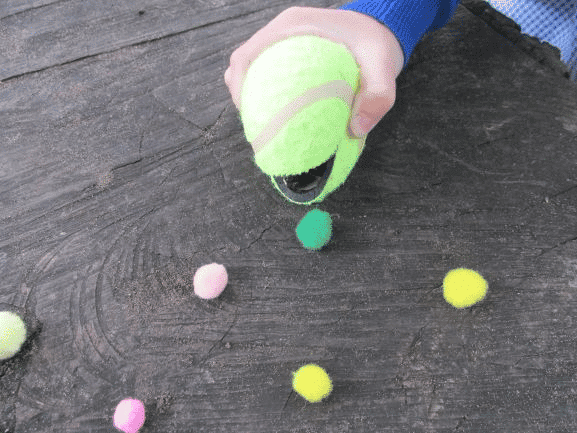
Get a tennis ball, and slice a hole in it with scissors or a knife. I have found dogs’ tennis balls work the best for this!
The hole becomes the mouth! If you now squeeze the ball, the mouth opens, and it looks just like a Pac-Man Monster.
There are all sorts of exciting activities you can do with these, but my favorite is simply to find some ‘food’ for the monster to eat. Something like pompoms would be perfect.
Put lots of pompoms into something like a big play tray. Then the pac-man monsters go around eating as many pompoms as possible, by squeezing the balls, opening the mouths, and picking them up. Hours of fun!
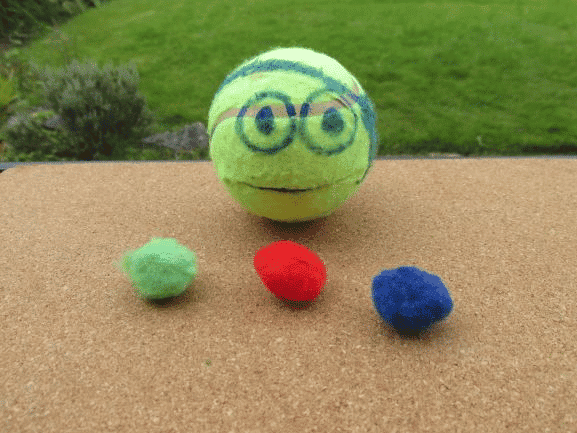
You can also decorate these balls in different ways to create a range of characters. For example, here is a Ninja Turtle tennis ball:
You can also try things like races, where the children try to eat as many pompoms as possible in a time limit.
All this tennis ball squeezing is brilliant for hand strength, and develops all those muscles in small hands.
2. Washing Day
Invite the children to help you have an old-fashioned washing day.
This is great to do outdoors on a nice sunny day. Provide the children with waterproof aprons and a water tray or washing-up bowl filled with warm soapy water.
Then all you need to do is find some items that need a wash. In my class, I used to find all the doll’s clothes and blankets, tea towels, and any other soft furnishings we had available.
Encourage the children to scrub the clothes, then wring out the water.
Really encourage the wringing movement. Ask the children to twist with both hands to rinse the water out of the clothes.
You could use words like:
Twist
Turn
Squeeze
You could even see how much water you can squeeze out by providing some empty containers.
When the clothes have been washed, they will need to be hung out. Have a clothesline in your outdoor area or garden and ask the children to peg the clothes on the line.
Pegging is a brilliant activity for building fine motor strength and developing the muscles ready to hold a pencil in a pincer grip.
The more they can peg, the better.
Ask the children to peg the items on the line with the pegs.
The younger the children, the more difficult they will find this, so help them to pinch the pegs at first if you need to, and leave some pegs and a washing line out so they can practice themselves once you have modeled it to them.
3. Pastry Faces
Any kind of dough is great for strengthening the muscles in the hands and improving fine motor development including:
Play-dough
Modelling clay
Plastercine
Pastry.
It’s a lovely idea to make the dough first with the children. There are plenty of simple pastry recipes around and flour, fat and water cost very little.
You could also use ready-made pastry if you wanted to. You will also need a bag of flour to stop the pastry sticking to your surface.
Provide the children with a clean flat surface, rolling pins, cutters and some flour for dusting.
It goes without saying that the children will need to wash their hands well and only use their own piece of pastry dough, to keep in line with current guidelines.
Ask the children to roll their piece of pastry into a ball, using the flat of their palm.
Show the children how to roll their piece of dough out flat with the rolling pin.
Encourage them to push and pull backwards and forwards as they do.
Ask them to push the cutter shape into the pastry and gently remove a pastry circle.
Use the leftover pieces of pastry to make the features of a face. Encourage the children to roll out small balls by using their palm in a circular movement and to roll longer pieces by pushing the flat of their hand backwards and forwards.
Like everything, this needs practice. Let the children use the shapes they have made to decorate their faces.
They can squeeze their pastry face into a ball and start again as many times as they like, or you can bake the faces in the oven. You can use currants or raisins if you prefer to make eyes, nose, and mouth.
You don’t have to stick to pastry faces. Here are some pastry activities I have done with my class:
Simple jam tarts.
Criss cross jam tarts.
Pastry animals
Pastry vehicles
Pastry shapes
Pastry flowers.
Pastry Christmas trees.
The children can even eat their pastry shapes at snack time. I used to provide jam or lemon curd to spread or dip. These activities are also great for developing fin motor skills.
4. Water Blast!
This is about as much fun as you can have!
This activity is perfect for a sunny day as there is some serious soaking going on usually.
The purpose of this activity is to give lots of practice in pulling the trigger to shoot water as this builds up both the pincher grip muscles and the upper arm muscles.
You will need:
A long tray of water, (builder’s trays are great for this activity).
Several water pistols
Some rubber/plastic ducks with numbers on
A supply of water
Waterproof aprons (optional)
Fill the tray with water so that the ducks float.
Give each child a water pistol and let them choose a duck.
Tell the children that on the count of three, they are going to shoot water at the ducks to make them travel across the tray to the other side.
The winner is the duck that touches the other side of the tray first.
(Also good for number recognition but the children will be having such a good time they won’t realize they are learning anything!)
You can easily adapt this activity to use:
Plastic boats
Recycled boats made from plastic tubs.
Corks
Or anything just as long as it floats.
I like to paint numbers on the ducks with nail polish as it doesn’t come off in the water.
5. Target Practice
This is another water pistol activity similar to the one above, but this time the children shoot at targets on a wall.
Find a wall (without doors or windows) that is suitable for the children to shoot at with a water pistol.
Using a piece of chalk, draw a large face on the wall.
Ask the children to listen carefully.
Depending on the age and stage of your children t’s a good idea to put their water pistols on the floor between each try.
When you say a part of the face they are to try and squirt their water pistol at it.
So, Ready, steady…..Nose.
This is really good for following instructions, increasing vocabulary, and of course squeezing the index fingers to build up that pincer grip.
Of course, you don’t have to draw a face. You could try shooting water at:
Numbers
Different shapes
Colors (if you have colored chalks)
Mini- beasts
Anything really – just have lots of fun!
6. Threading
Sometimes the old ones are the best and we still use them for good reasons.
When children thread objects, they are using most of the muscles in their hands, as they pinch, twist, push and pull with small precise movements.
Threading can also help to develop the muscles in the whole of the upper arm and shoulders – which is vital for being able to write comfortably later on.
There are many colorful, attractive resources you can buy to develop the children’s skills in threading, but if you are at home, here are a few of my favorites:
Pasta necklaces
Provide the children with a bag of rigatoni, or a similar shaped pasta and some shoe laces or thick string. If you want to make this activity more creative, the children can paint the pasta before or after they have made their necklace.
Cheerio bracelets
The same principle, but use cereal. Cheerios are smaller and so the children will need to be more precise.
Button friendship bracelets
Choose some buttons that your friend would like. Think about the colors, size, and shape of the buttons. This can be tricky due to the very small holes in some buttons, so consider the stage of the children first and the types of buttons you are using.
Leaf threading
Tie a knot in a shoe lace and ask the children to collect as many different shaped and sized leaves as they can.
Push the shoelace through the middle of the leaves to thread the leaves together to create leaf mobiles/decorations. This is particularly effective in Autumn when you can talk about all the different shades of colors.
Curtain rings
If you have any old curtain rings lying around, this is a great one to start with as curtain rings tend to be chunky and wooden so they are easier for little fingers to manipulate. Use thick string or thin ropes to make necklaces.
7. Hole Punch Magic!
You can buy all sorts of craft hole punches now, and these can create a range of different holes – stars, crescents, hearts, and all other sorts of options.
These hole punches are a brilliant way to interest young children, and getting them using fine motor skills without even knowing it!
Making holes in leaves is an activity all children enjoy:
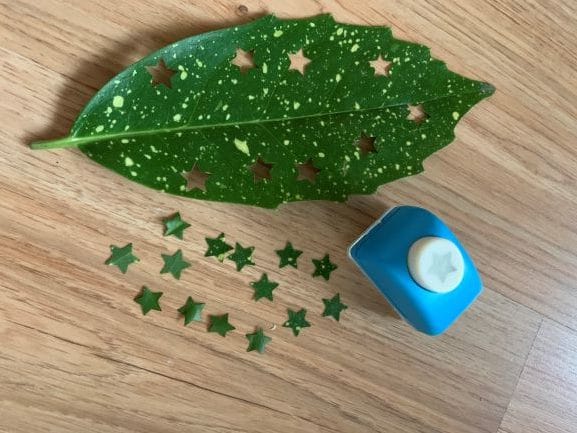
You can also make holes in paper, card, and flowers.
The confetti that you generate from doing it is also great for picking up with tweezers, in itself a fantastic fine motor experience.
8. Tear it up!
What? I hear you cry. I don’t want my children to start ripping and tearing things up!
Ripping and tearing paper are actually really important skills in developing fine motor control!
Provide old magazines or newspapers, or use the paper in your recycle boxes. You could also use old envelopes, junk mail, or any old paper you have around.
Ask the children to rip the paper and tear it into the smallest pieces they possibly can. Keep trying to see if they can make the pieces even smaller. Who can make the smallest pieces of all?
Talk about teeny, tiny, miniature, and minuscule pieces.
Again, this is about controlling the many muscles in the thumb and index finger and strengthening them. Keep the tiny pieces of ripped paper in tubs as they can then be recycled to use for craft or mosaic work.
Some children like to tear along a line at first, so just draw random lines on the scrap paper and see if they can tear along the lines.
You can also try this activity with leaves. Ask the children to tear up different leaves into the smallest pieces they can.
Spirals
This is a similar variation to Tear it up. On large pieces of recycled paper, draw spirals. Show the children how to tear along the spiral lines to make a spiral mobile, then ask the children to tear along the curves themselves. Again, you will need to adjust the size and difficulty of the spirals depending on the stage of the children.
Palm trees
Draw horizontal lines across a newspaper and rip the pages down the lines, without ripping through the whole page. Twist the newspaper around and bind it with an elastic band to make a palm tree effect.
9. Planting Seeds
Seeds come in all different shapes and sizes, but many are tiny.
This gives the children an opportunity to pick them up between their fingers, requiring precision and dexterity.
As well as being a great activity for developing speaking and listening, and observation skills, picking up and planting seeds is also great for developing fine motor skills.
Ask the children to fill a pot with compost.
Push their finger into the pot to make a hole with their index finger in the middle.
Pick up a seed between their fingers and put it in the hole.
Cover the hole with a little bit more compost.
Repeat.
Using a water spray with a trigger to water the pot every day will also help to practice those pincer movements again.
10. Finger Painting
Another good activity for working on pincer grip and developing creativity.
This is all about precision.
Provide a large sheet of paper and some ready mix paint in saucers.
Encourage the children to dip their fingers in the paint, getting a dab of paint on their index finger.
To start with, you might want to draw a simple picture or shape for the children to dab along the lines. Once they have got the idea, you can add different colors and encourage them to be creative themselves.
You could also add cotton buds or Q-tips here. Encourage the children to dab the cotton bud or Q-tip into the paint and dot and dab the paint in lines and curves.
11. Tweezers!
Sorting is how we make sense of our world.
Young children need lots of practice and opportunities in sorting objects into colors, shapes, and sizes. They also need opportunities to match objects as these are the pre-cursors to reading skills.
You can start off with sorting small objects into sets by hand, and if the children can do this easily, try adding a pair of tweezers to pick up the objects with.
I’ve always found cake tins to be great for this but you could also use a collection of empty containers. Provide lots of loose parts such as buttons, curtain hoops, shells, pebbles, pasta shapes, marbles.
Any small but interesting objects would work well here.
Ask the children to sort the objects out into the containers/cake trays. If cosmetic tweezers are too difficult, you can buy some large plastic tweezers now from most resource companies that are perfect for little chubby hands.
12. Finger Rhymes
Singing songs and rhymes are a vital part of every child’s language development and I’m sure you use them on a daily basis.
Even our youngest children and even babies can start to join in with finger rhymes and actions. But they can also help to develop fine motor control as children naturally join in with the actions to songs and rhymes.
Two little dicky birds.
Round and round the garden
Incy wincy spider
The mouse who lived in a house.
One, two, three four five, Once I caught a fish alive.
I taught Nursery for many years before becoming an advisor and I always liked to use a selection of new and traditional finger rhymes. If you introduce Makaton signs it is the same principle.
Those are my top ten ideas, but hopefully, they may have sparked many other ideas. Most teachers and practitioners are providing fine motor activities without even realizing it!