Teaching phonics needs imagination, creativity, and…a bit of DIY thrown in!
In my twenty-plus years of teaching phonics, I have tried all sorts of fun games. In this post, I’m going to share the very best.
Traditionally, children have been taught letter sounds in quite a formal way, usually sitting at a table or a desk. Eek!
We now recognize that children learn in many different ways so the good news is that you can teach phonics in lots of different ways and make learning to read more fun than it has ever been before.
An additional benefit is that if you teach phonics using a variety of learning styles, children who would previously have struggled will have a much better chance of learning to read successfully. Even better – they will be learning lots of other skills as they learn their letter sounds.
My favorite 21 DIY phonics games are:
- Phonics Dice
- DIY Phoneme Frames
- Dough Aliens
- Screw and cogs
- Train track phonics
- Clothesline phonics
- Painting easel phonics
- Playdough/Clay
- Pegging Boards
- Mark-Making/Chalking
- Paintbrushes and Water
- Jump Rope Phonics
- Mud
- Transient Art
- Sand Tray
- Shaving Foam
- Cut And Stick Treasure Hunt
- Human Letters
- Fishing Game
- Pastry Letters
- Guess The Letter
In this post, I’ll go through how to play all of these. All are very simple, doable, exciting…and well, worth giving a try!
1. Phonics Dice
These are such gorgeous resources! All you need are three building blocks that you don’t want to use anymore – or you can chop up a piece of wood into three cubes if you like.
My phonics dice look like this:
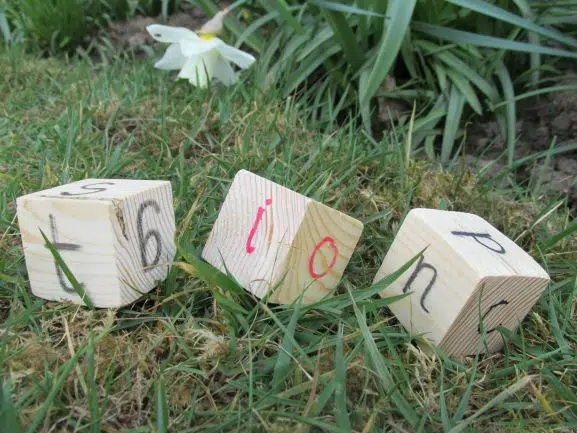
I have two consonant dice and one vowel dice. The consonant dice are written in black pen, and the vowel in red (permanent marker). The idea is that the child rolls three dice, and then tries to make a word. If you go black-red-black then you always make some kind of word, either real or silly.
You could write down the words you find. Or you could have a ‘star’ word that you are trying to roll. (So, whoever rolls ‘tin’, for example, is the champion!)
2. DIY Phoneme Frames
Phoneme frames are one of the best ways to introduce children to reading simple words. They help structure the sounds in a word, and that really aids children to sound out and blend the word.
You can make phoneme frames out of all sorts of things, including:
- Log slices
- Pieces of materials
- Drawn on the ground with chalk
- Drawn on paper with big pens
One of my favorite ways to make phoneme frames is on a log slice, with sounds written on pebbles. The kids then create words on the log slices.
Here’s what my phoneme frames look like:
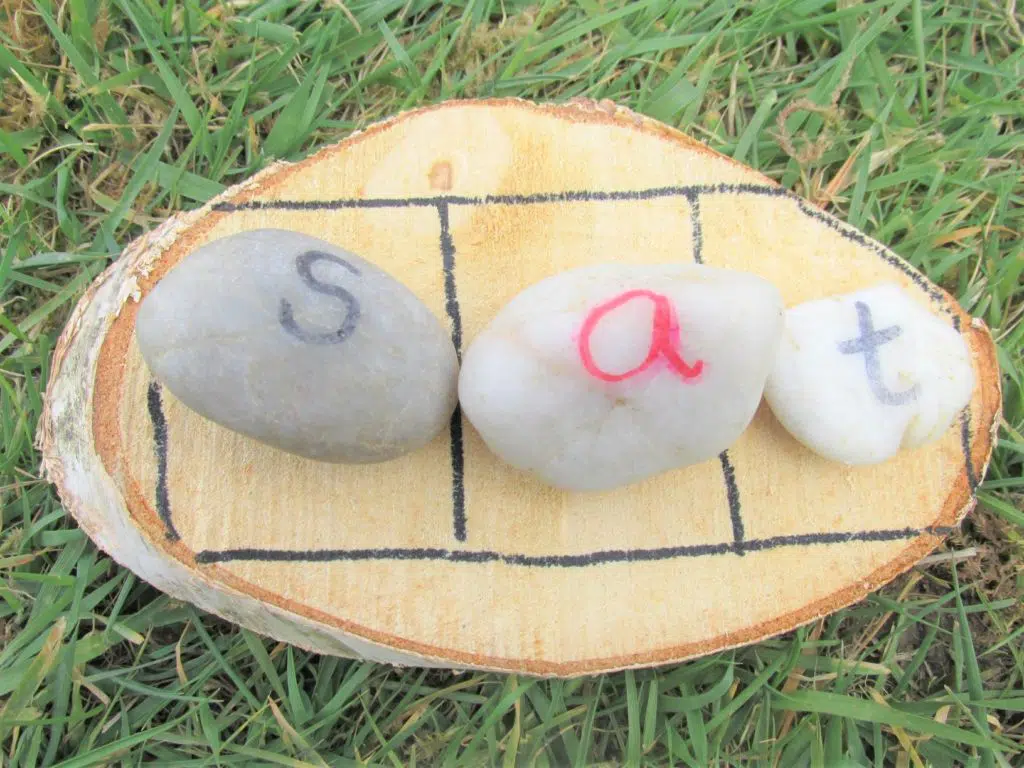
In the picture, we are using very simple single letters – such as ‘s’, ‘t’, and ‘n’. But you could use more difficult letters of the alphabet or even phonemes with two or three letters in them.
3. Bolt and Cogs
For this, you need a long bolt and at least three cogs that can be twisted onto it. Most cogs have six faces, and any kind of cog with a few faces will be perfect for this activity.
Using a permanent marker, write some letters on the faces of the cogs. In the end, they will look something like this:

The children can spin the cogs around and try to make words. This is great for all children who love fiddling with things, and physical learning.
4. Painting Easel
Set up your painting easel with a few different colored paints and ask the children to paint the letter sound they are currently learning.
Encourage them to say the sound out loud as they paint it. Encourage them to paint great big letters using a thick brush or tiny versions, using a thin precise paintbrush. Younger children may need a dot to dot letter to help them at first.
Another option for older children is to cover the easel in old magazines or newspapers and ask them to dot paint on the letter or letter group – a sort of letter treasure hunt.
Provide plenty of paper to practice and praise all their attempts.
Alternatively, you can provide a letter template and ask the children to paint over it and then reveal its outline.
5. Play Dough / Clay
Most children love play-dough.
Provide a large amount of good quality dough. I always find that homemade dough is cheaper and better quality than commercial playdough, and there is usually more of it.
Provide each child with a mat and ask them to roll, stretch and bend the dough into the letter or letter group they are currently working on. This can work well with spelling words too.
I find that if children have to physically make the letters in a word, they are much more likely to remember them.
6. Dough Aliens
Pretty much all children like aliens and this activity really taps into this passion that many have.
All you need for this is a lump of playdough or plasticine, and some popsicle sticks with letters written on them.
The idea is to make aliens! The lump of dough is the alien’s head. The three popsicle sticks then become the antennae. Build an alien, and then try to read the word. Here’s what one will look like:
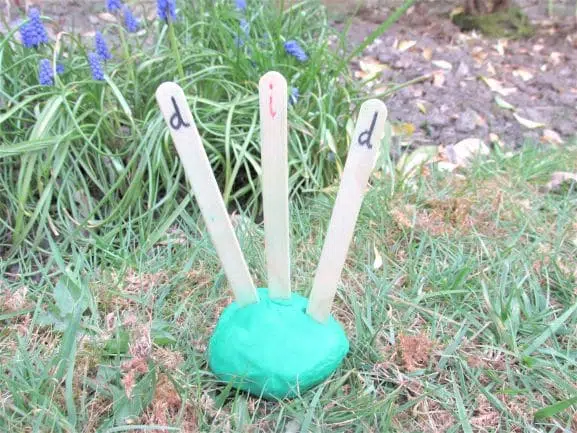
You can have a list of alien words that the children could try to create with the sticks.
Or you could just build words and try to read them, with random letters. Some words would be real and some would be nonsense. (but that is all good!)
7. Pegging Boards
Most classrooms have a set of peg boards and pegs.
Ask the children to make a letter on the peg board. Depending on the age and stage of the children, you may want to provide a template of the letter by writing it on a large piece of paper or a whiteboard.
Ask the children to carefully copy the shape of the letter with the pegs. Don’t forget to encourage them to say the letter or group of letters.
8. Mark Making/Chalking
There are endless possibilities in this activity.
Depending on the age and stage of the children, start them off by modelling the letter you want them to practise and provide them with as many different mark making experiences as you can.
I like to lay out a roll of wallpaper across the floor and let the children experiment with chalk, felt pens, glitter pens, crayons, highlighters or anything you have to make this as interesting as possible. You should end up with a sheet of paper covered in different versions of the letter sound / group of letters or words.
You can also take this activity outside by using chunky chalks. Simply ask the children to write their letter sound on the yard / walls.
9. Paintbrushes And Water
So simple but so much fun!
For this activity you will need a few buckets and a few decorators paintbrushes. You could also use painting aprons if you want to.
This activity works best on a sunny day when the outdoor area is nice and dry and the water dries quickly. Use the paintbrushes, dipped in the water bucket to paint your letter sounds across the yard and the walls. Children who are reluctant to write in a workbook often excel at this, as its a very non-threatening activity.
The water marks are not permanent and on a sunny day they disappear quickly. You could decorate a whole wall with one sound, for example write ssss on every brick, or you could write a group of letters on every brick in the wall, for example, at, pat, cat, mat.
10. Train Track Phonics
You’ve probably noticed how many children are obsessed with train tracks!
Why not try to get trains and tracks into phonics. It’s super simple. You either write one letter on each section of train track, or, if you don’t want to permanently destroy your track, you could write letters on little pieces of masking tape that you can peel off at the end.
The masking tape pieces on the track look a bit like this:
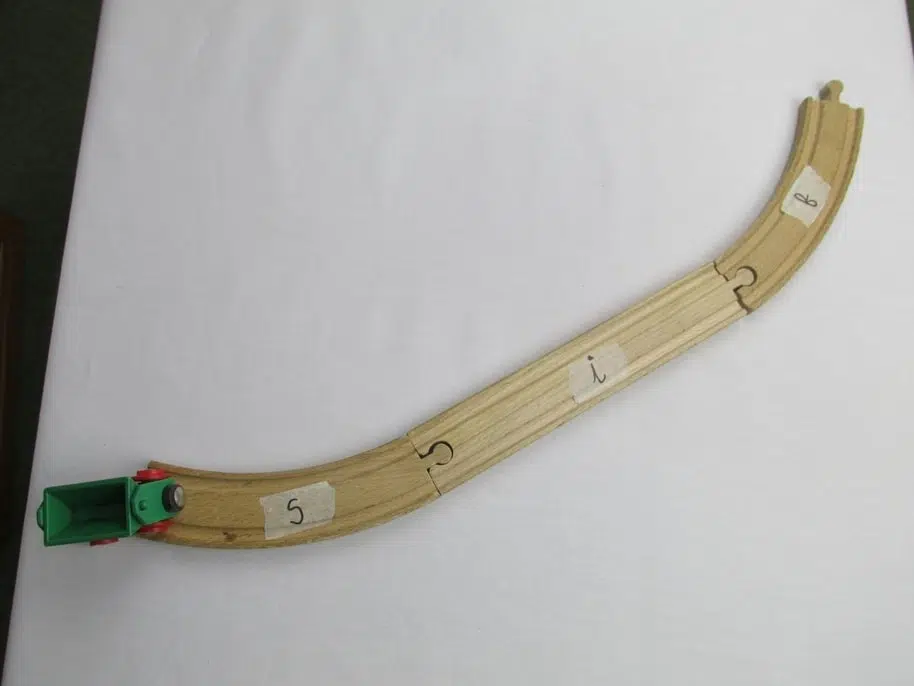
Children then drive the train over the letters while saying the letter as they go over it. You could extend this to more complex sounds, or even having words written in a sentence that they read one at a time as they go along the track.
11. Jump Rope Letters
Tangled together at the back of most school PE cupboards is a box of jump ropes.
Why not give them a new lease of life and use them for your phonic lesson. Ask the children to bend the ropes into letter shapes, or groups of letters. This is also great for team work and problem solving.
Older children can use the ropes to bend them into whole words.
12. Mud
This activity is as cheap as chips but is so much fun.
All you need is a patch of mud and some good sized, sturdy sticks. Simply write the letter sounds in the mud.
If you make a mistake, it’s no problem. Stamp in the mud until the letter has disappeared and have another go.
I’ve always found that learning in this way really encourages boys to take an interest in phonics as they love being outdoors and don’t even realise that they are doing a phonic lesson or learning a new sound.
13. Transient Art
Begin by asking your children to go on a treasure hunt and collect whatever is in season in your outdoor area.
You might collect acorns, conkers, dandelions, seed pods, dried grass or leaves. Then, simply use the natural materials to make the shape of the letter sound.
You could all work together to make one large letter or work individually to make lots of versions of a letter sound. It’s a good idea to take photographs of the letters as this can also make a stunning display.
14. Sand Tray Phonics
You’ve probably got the idea by now, but don’t forget about sand. You can either use a large sand tray or provide children with an individual tray of dry sand at their table. If you are using dry sand it’s a nice experience to just write letters with your index finger, or you could use a small stick.
If you are using wet sand you can work on a larger scale and introduce writing tools such as plastic knives, wheels, printing tools or rakes.
15.Clothes Line Phonics
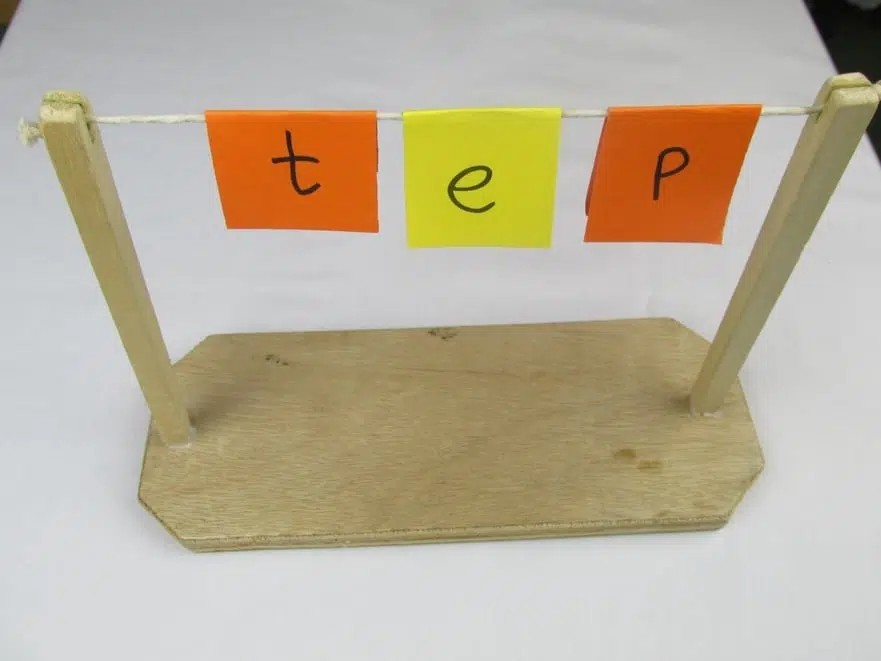
I use clothes lines for all sorts of things, and they’re fantastic for early phonics. The ones I use the most are some DIY mini-clothes lines that look a bit like this:
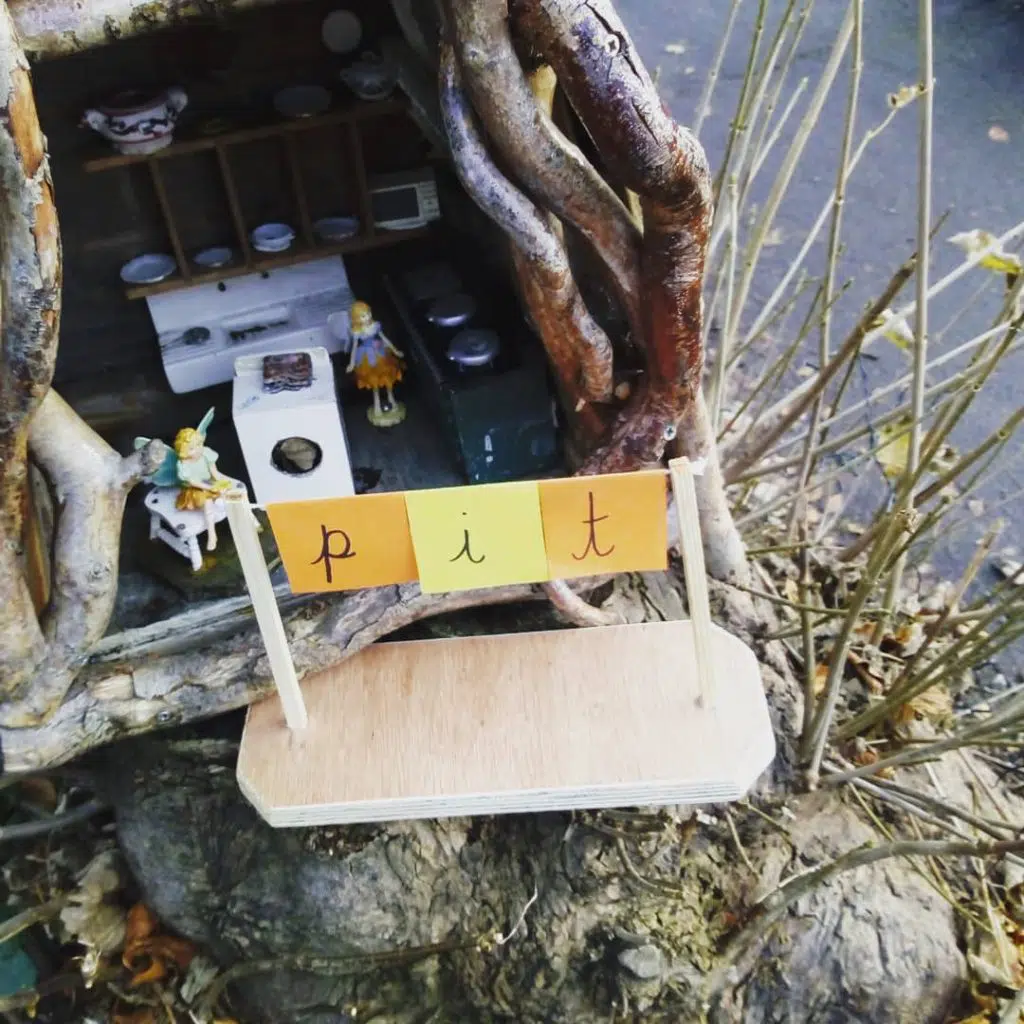
If you like DIY, then they’re pretty simple to make. They are just a pice of wood for a base, with two holes drilled into it, and two pieces of dowel superglued into the holes.
Attach a piece of string along the top and away you go!
You can peg letters onto the lines. But much easier, is to use little pieces of cards bent over (with letters on). These can be hooked straight onto the lines, and these are far easier for children with fine motor issues.
You can build words on the lines, or you can try to build sentences (with whole words written on individual cards).
16. Shaving Foam
If you have a tuff spot or big play-tray then this works brilliantly in that – if not, no need to worry. A table top works just as well.
First, check that none of the children have any allergies to shaving foam. Most children are fine, but you should always check just in case.
Squirt a small amount of shaving foam and ask the children to rub it all over the table. Then practise drawing the letter sound you are working on in the foam.
Older children love this as an alternative to writing their spellings in their workbooks. It’s therapeutic and fun and they will learn their phonic sounds easier than they ever would if you asked them to write them out in a book.
You can replace the shaving foam with soap suds and paintbrushes if you do have a child with allergies.
17. Cut and Stick Treasure Hunt
Provide lots of old magazines, newspapers and old cardboard boxes for example, cereal boxes.
Ask the children to search for the letter sound you are currently working on. This is a bit like a treasure hunt and I like to provide magnifying glasses to encourage them to look really closely.
If they have the skills, you can ask the children to cut out the letters and stick them on to card to make a letter collage.
18. Human Letters
This is great for children who are active learners and like to be physical. Ask them if they can physically make a letter sound with their own body.
They can try to do this alone, with a partner or in a small group.
Depending on the age and stage of the children, you may need to give them a visual letter symbol to copy. Ask the children to take photographs of their body shapes so that they can decide if they were successful. They can ask another group to guess which letter they were making.
Encourage making letters by lying down or standing up.
19. Fishing Game
You can easily incorporate your water tray into a phonic lesson by playing this fishing game.
Fill the water tray with water and add some foam letters if you have them. If not, there’s no need to worry. You could use plastic letter tiles, Unifix cubes with letters on or even laminated letters.
The idea is to have lots of different letters floating about in your water. Add a few children’s fishing nets, and ask them to fish for certain letter sounds. This is great for recognising the shape of letters which is a really important skills when children start to read.
No need to tell the children that! Just let them have fun fishing for letter sounds.
20. Pastry Letters
You can prepare some simple pastry before hand for this phonic activity, but I prefer to make a quick pastry recipe with the children.
Weighing out the flour and rubbing in the fat are great for developing the muscles in the hands and it’s really important that young children get lots of opportunities for developing their finger and arm muscles before they start to write, so that the writing process isn’t painful.
Kneading pastry is also great for developing those fine and gross motor skills. When you have your pastry ready, ask the children to make some pastry letters.
If you have cutter templates, you could use those, but I prefer to roll the pastry into thin tubes and then curl it or cut it into letter shapes. If your children are at the stage of blending letters, they could make a pastry word.
Bake the pastry until it’s golden brown. We’ve served pastry letters for snack, dipped in jam or lemon curd to reinforce the letter sounds before they’re eaten.
21. Guess The Letter
This activity is a good one when the children are at the stage of knowing most, if not all of the lower case letter sounds. Ask a child to turn around, and then gently write a letter on their back.
You may need to repeat it a few times. See if they can guess which letter you are writing. Once they have the hang of the game, they can play with a partner. I like to give each pair an alphabet strip to help prompt them for this game.
Summing Up
Hopefully, that’s given you lots of ideas to teach phonics in a fun and enjoyable way.
I have always found that by using lots of sensory activities to teach the letter sounds, the children in my class made rapid progress and were all completely engaged in the activities.
Often, they didn’t even realise they were in a phonic lesson they were having so much fun.
